Sunday 27 July 2014

Chalkboard Serving Tray

A Chalkboard Serving Tray is beautiful addition to any home. Think of the possibilities!
My Crafty Girlfriend invited me over for an evening of crafting at her home. 
We made these beautiful serving trays, with a chalkboard on them! How genius is that?!
This wood is 2 x 10 and cut at 2.5 feet long. 
We applied a coat of stain to the edges and backside, yet tried to avoid the middle area where we planned to paint the chalkboard. 
Here you can see the front side of one tray and the backside of the other. 
The wood is pine and the stain is "Early American".
Using painter tape, we taped off the area to apply the chalkboard paint. 
A little trick to make sure the paint doesn't bleed under the tape: 
Paint a thin layer of Modge Podge over the edge of the tape, this will seal up the edge. 
Have a drink while that dries....
Now paint the taped off area with chalkboard paint. Use long even strokes to avoid brush marks in the paint
Now go ahead and remove the tape.
Do this before the paint dries or you risk the paint chipping off along the taped line. 
See? Beautiful clean, crisp lines!
Now, add hardware for handles. 
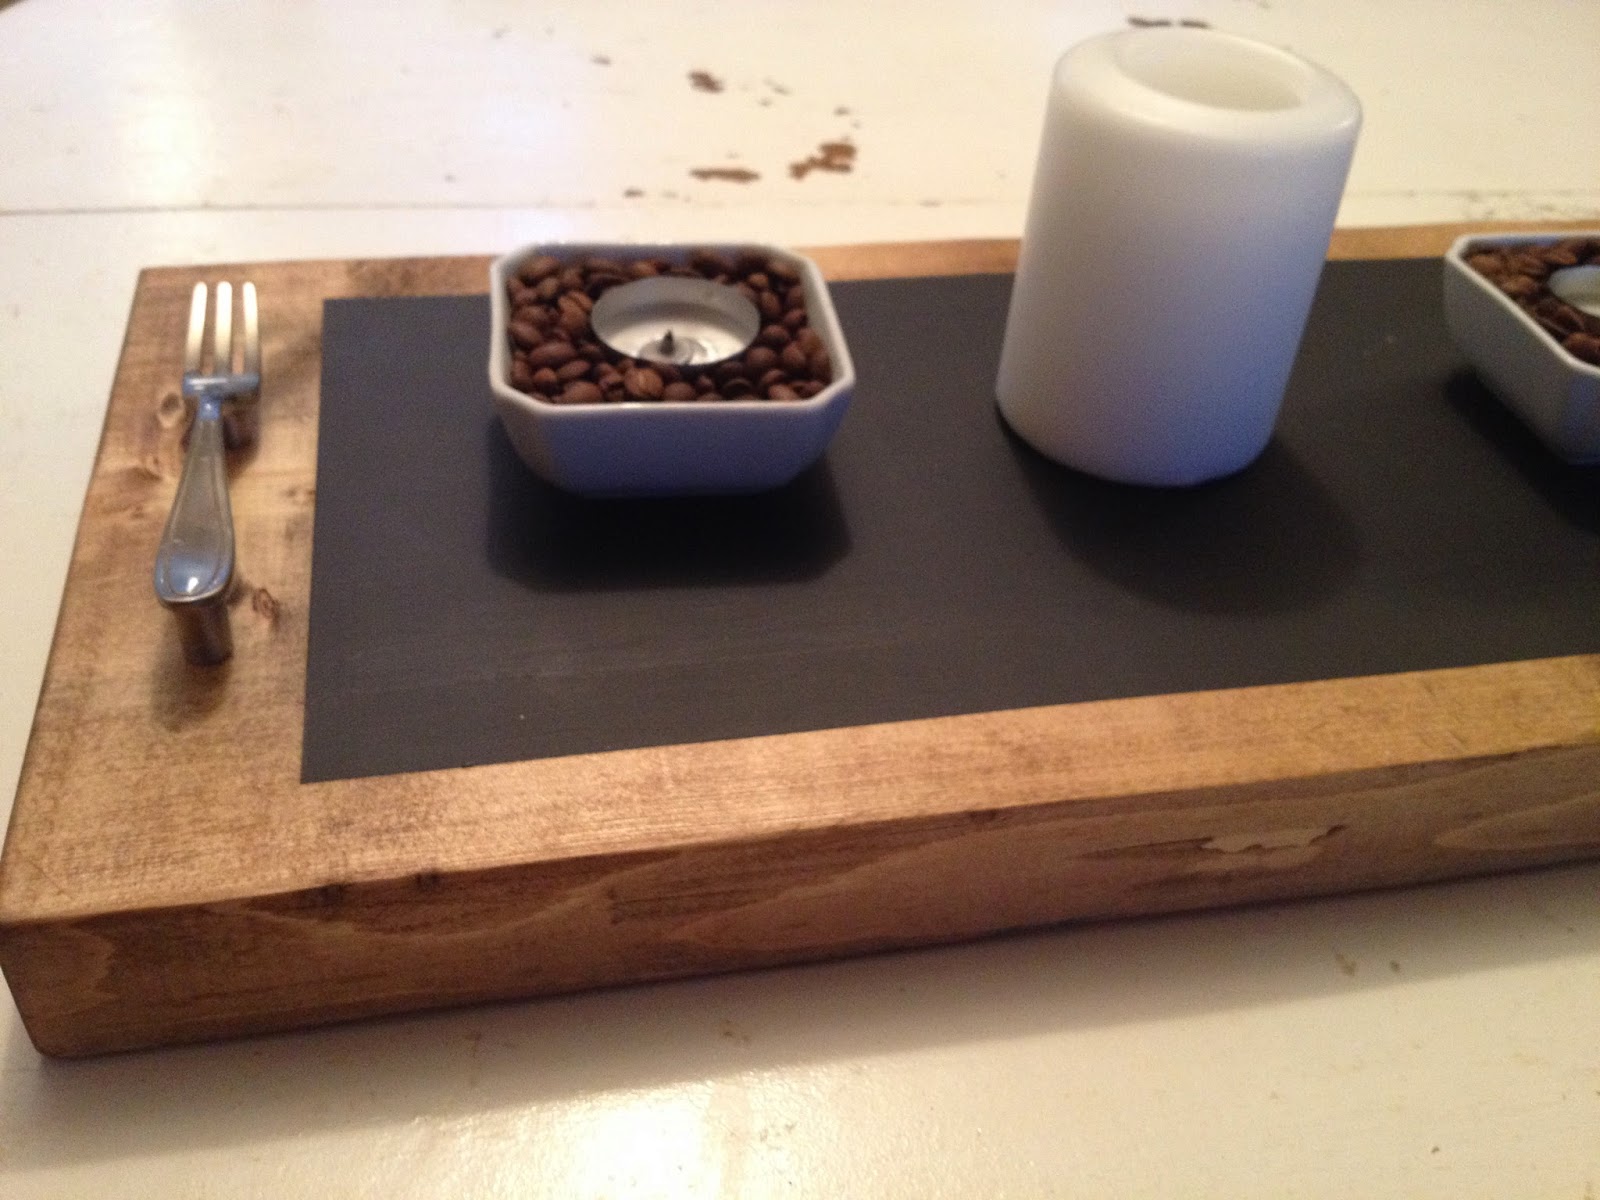
How perfect are these? Super cute little fork and knife!
A beautiful centerpiece or serving tray!
Please note: unfortunately you have to wait about 72 hours until the chalkboard paint is completely dry. Then you have to lightly put chalk all over it and rub it off before you can write anything. Oh, and when you wipe the chalk off at the end of your party you can use a damp cloth but then you have to repeat these steps again. So friends, that is why there are no pictures of chalk words on the chalkboard tray....still waiting!

Monday 21 July 2014

Bacon Jam


I'd seen and heard of this a few times on various Food Network shows and figured it's worth a try. Mom was making burgers for my brother's birthday, so I thought this would be a great chance to try it out as the spread for the burger. This is a recipe that has lots of versions available, all fairly similar and this is the one I decided to follow for the first attempt.
http://leitesculinaria.com/82690/recipes-bacon-jam.html

I liked that it had ingredients that I already had in the pantry, it had the option for stove-top or slow-cooker, and that in the comments were suggestions for changes to the recipe that others had already tried.

Original Ingredients:
1-1/2 pounds sliced bacon, cut into 1-inch pieces
2 medium yellow onions, diced
3 garlic cloves, smashed and peeled
3/4 cup strongly brewed coffee
1/2 cup cider vinegar
1/2 cup packed dark brown sugar
1/4 cup maple syrup

My adjustments:
- I didn't have maple syrup, so I used maple-flavoured bacon for the full pound, regular bacon for the 1/2 pound
- I had light brown sugar in the pantry
- The "strongly brewed coffee" was an extra scoop of grounds than I would normally make

Directions: 
1. In a large skillet over medium heat, cook the bacon, stirring occasionally, until the fat is rendered and the bacon is lightly browned, about 20 minutes.
(All that bacon is quite a pile, literally. I ended up cooking it in two batches.)
Transfer to paper-towel-lined plates to drain.

2. Pour off all but 1 tablespoon of the drippings from the skillet (reserve the extra for another use). Add the onions and garlic to the skillet and cook until the onions are translucent, about 6 minutes.

3. Add the coffee, vinegar, brown sugar, and syrup and bring to a boil. Cook for 2 minutes, stirring and scraping up any browned bits from the skillet.

4. Add the bacon. Reduce heat to a bare simmer and cook uncovered, stirring occasionally, until the liquid almost completely evaporates and turns syrupy, 1 to 1-1/2 hours. (Warning: this will really make your kitchen smell like vinegar for a day or so.)

 5. Let the bacon concoction (this quoted directly from the original recipe, love it!) cool slightly before transferring to a food processor and pulsing until coarsely chopped.

6. Spoon the bacon lusciousness (their word again!) into individual jars or other resealable containers and refrigerate for up to 4 weeks. Rewarm gently over low heat prior to use.
I had used an old salsa jar that has a button seal on top. When I put the jam in the jar it was still slightly warm and I put it directly into the fridge. I heard the jar seal a little while later, lucky me!

I turned out sweeter than I had expected with a definite maple flavour from the bacon. It's definitely a sweet and savoury combination that worked well for the hamburgers. I also thought it was also quite good on crackers for a snack. Some friends thought it could be interesting as a topping for cheesecake, so if we ever get around to trying that I'll be sure to let you know how it goes!

~Lisa

Sunday 13 July 2014

Rustic Serving Tray

To celebrate my birthday this year I hosted a Garden Tea Party. 
And of course, every Two Crafty Girls party includes a crafting project!
This year we made Rustic Serving Trays. 
I had prepared the wood before the party. Using 2 x 12 I cut 2 foot lengths for each tray. We gathered stains, paints, and brushes and met in my backyard to get creative. 
First we sanded the wood to remove any rough bits and then used hammers and nails and whatever else looked dangerous to bang up the wood and make it appear a bit more rustic. 
Everyone took their own approach....some painted first then stained, others stained first then added some paint, some painted then stained and then painted again. The thing to remember is that you can't really mess this up. If you don't like it, you can add something else or sand it down. It's supposed to be rustic and uneven and a bit worn looking. Just try it, you can't get it wrong. 
After the first coat of stain or paint had been applied, we took a break to let everything dry.
We had some tea, and finger sandwiches, and scones, and sweets.
A lovely Tea Party for the ladies!
Ok, back to work! 
Now that the first layer was dry we were able to dry brush on the next layer(s). Some added a touch of white over the paint to make it look aged. 
Then sanded it again to make it smooth, and to blend the colours a bit. This is optional, of course, and some people liked the look with out a final sanding. 
(Her little baby girl arrived a few days after the party - healthy and no doubt happy to have some handmade pink decor in her nursery!)
Everybody wanted to check out each other's work! 
All that's left is to add on the handles. These are just hammered black drawers pulls. They come with the screws, and we just drilled them on. Some liked the off-set look, and others placed them square. 
How awesome did these turn out?!?
I had a few leftover pieces, so the next day I got a bit creative and made a few extras as gifts. 
A Rustic Serving Tray makes a beautiful centerpiece!