Showing posts with label Decor. Show all posts

Monday, 4 May 2015

Design Inspiration

Lately, I've been considering updating the painting in my house. I've lived here for over 11 years now, so it's just time for some changes, and paint is definitely going to be cheaper than finishing the basement (though that's on the "To Do" list for sure).
Jess had mentioned once that she looked for colour palettes on Pinterest for card making, so I had a look. Some had links to looking for inspiration from other fabrics or things you have, so I'll probably head in that direction. I already used my kitchen chairs (some of the seat pictured above) as inspiration for some accent paint around my pantry door, so I'll now probably use some of the neutrals in it to have some continuity throughout the house.
*Note: The two paint sample strips on the chair were to figure out the best colour to use and my design friends said I could actually use any of those colours. I went with the top left for the wall as I thought it was a little more vibrant than the bottom row.

Aaaanywho, I ended up pinning quite a few colour palettes as I figured I'd need them at some point anyway in my crafting. And I discovered that I had quite a few from Design Seeds (http://design-seeds.com/), so I explored that site more and thought I'd share.

http://design-seeds.com/home/entry/petaled-hues5
What I liked about that site is that it gives you an image and pulls colours from it. Then if you like a particular one, you can click on it on the right side under "see similar colours" and it will take you to other colour palettes that use similar colours. For example, I clicked on the top-right greenish colour and got to eight different palettes that might work, depending on what overall feeling your going for. http://design-seeds.com/search?hex=cfccb0

So this is all well and good, great for card making, maybe some clothing design, inspiration for choosing colour options, but this doesn't really help you buy the paint for the walls.

But wait! I found another website that will help with that. EasyRBG http://www.easyrgb.com/?X=SEEK

This will take computer colours and turn them into the paint colour names from different companies. You'll need either the RGB values or the hex code of the colour. The beauty of the Design Seeds site is that if you hover your mouse over the colour, the hex code will pop up. It's also the end code of the webpage you follow if you click to see the similar colours. So for the greenish colour noted above you can see the end string is "cfccb0".

I know my local paint store sells Benjamin Moore paint, so I entered "cfccb0" in the colour code, chose the "Benjamin Moore Color Preview" as my color collection, and voilĂ ! It gives me the names of four optional matches that Benjamin Moore produces. The centre block is the colour I entered and the four smaller ones around it are the options. In this case, it came up with Guillford Green, Soft Fern, Abingdon Putty, and Carrington Beige.
So now just head to the store, grab those colour samples and decide where your project is headed.

Translating computer screen colour to real life may take a little trial and error, but here's some help to getting the ideas from your head onto the walls!

~Lisa


Friday, 6 March 2015

Open Kitchen Shelves

Back before Christmas, I was hanging out with my sister and was snooping on her Pinterest page. Which I recommend you do sometime, just have a look at someone else's page because it's interesting to see what they follow and what might catch your eye. Anywho, I saw some open kitchen shelves and thought they looked really good and figured they'd be a nice way to display all the glass jars I have, but didn't know where I would put them because my house really isn't that big. So imagine my surprise when I took down the 2014 calendar in January and discovered a section of open wall in my kitchen that would be the perfect spot! :)
I originally thought I'd try to use some more leftover barn wood, but Dad said there probably wasn't the right size (a shelf is actually quite wide) and would likely be warped, so not good for shelving, and buying pine panels would probably be a better idea.
The total cost for the four shelves was about $110.
- two solid pine panels from Home Hardware, 12"x 60", $25 each
- eight brackets from Lowe's, $6 each
- new stain, about $8 from Lowe's
- small brush and plastic tablecloth, $1 each from Dollarama (so I could just throw them out instead of having to clean)
Home Hardware had a larger selection of the solid pine panels and Lowe's had much better choices for the brackets and that's the reason for choosing each store. And it took me a bit to find the stain. I was looking for "Early American" to match my kitchen table but all I could find was "American Colonial", which is actually just the French side facing out, but caused me to spend several minutes looking at every stain colour trying to find what I wanted.

There is quite a variety of sizes of panels, but the shelf ones are either 8" or 12". A foot wide seemed to big, but 8" not wide enough, and I had to laugh at myself when Dad suggested I could just trim them down because it never actually crossed my mind to do that. I was planning to cut the long boards in half to get the width I need, but just never thought about trimming the depth. And considering how much time I spent with the table saw when I built the table you'd think I'd be familiar with the all the options. I ended up trimming them to 10.5" so they were deep enough to hold some cookbooks without the edge of the book hanging off.
I just cut the boards quickly one day when I was out at my parents and I forgot to take pictures of that process, but I'm sure you can imagine what it looked like. The only thing to mention with these pine panels is to consider where the knots are in the wood and what you're doing with them. You might be alright with having some notches in the wood if a piece of a knot falls out, but I wanted a smooth edge for the shelves. So on one panel I trimmed 1.5" off one side, and one the other panel I cut 0.75" off each side to avoid the knots. Then I cut each panel in half to end up with four shelves that are each 10.5" x 30".
I gave them a quick sanding on all the edges to get rid of any slivers and smooth out the cut marks from the table saw.
Then I took them into the basement to stain the boards. I just covered my old kitchen table with a plastic table cloth from the dollar store to protect it. I also put down the newspaper to absorb any stain that might get dropped instead of having it sit on the plastic and probably get on my clothes.

I did two coats of stain and it's probably good that I had purchased more because it actually took most of that small can. I did the first coat after work one day and let them dry for 6 hours and did the second coat right before going to bed.
Top: First coat of stain, Bottom: Plain board
Left side: One coat of stain, Right side: Two coats of stain
Then I left them to dry for a few days in the basement. Not that they needed to be left that long necessarily, just that it took me that long to get around to actually putting them up.
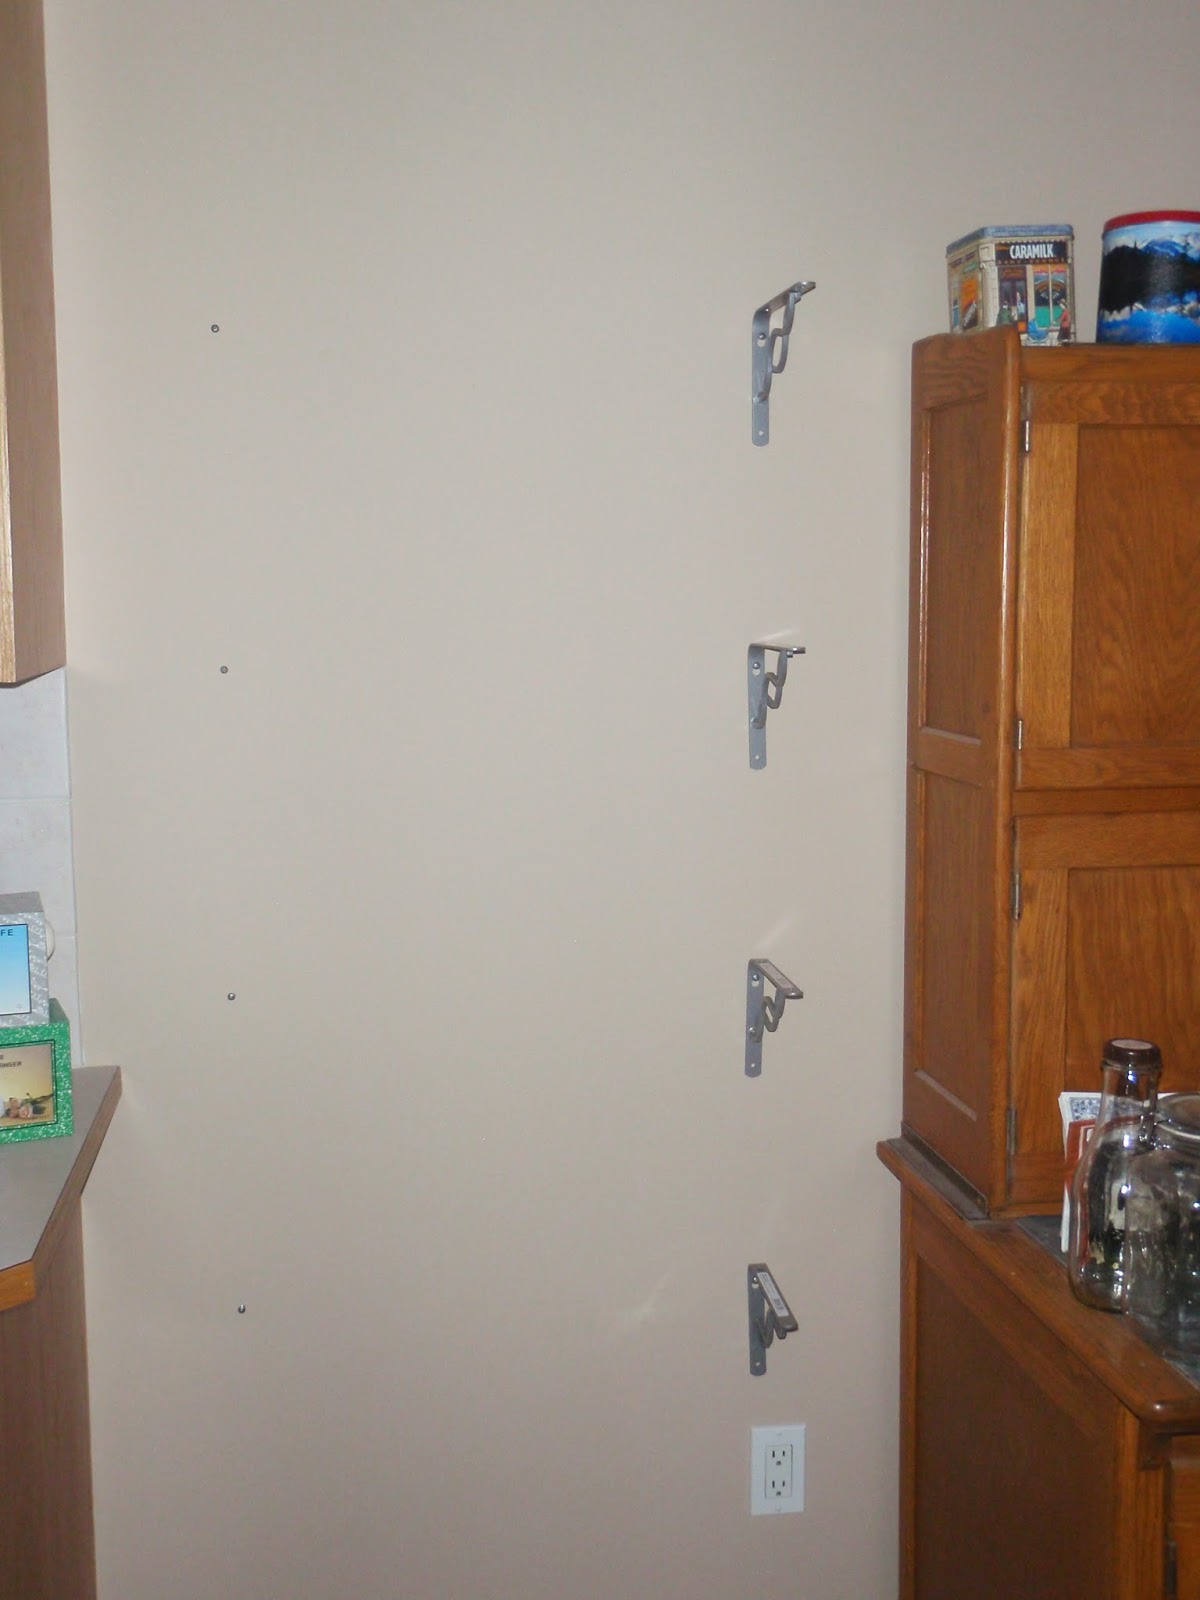
I first started by marking with masking tape where I thought I wanted the shelves. It's kind of hard to see the tape on the wall in the picture, but the biggest thing I wanted to make sure was that the shelves wouldn't be in the same spot as either the top or bottom of the cabinets.
I used a stud finder, a tape measure, a level, and a piece of 2x4 mark the spots where I would drill the holes for the screws. The cordless drill I bought a couple months ago sure came in handy here. This would have killed my arm to do this manually!
Here's one side of the brackets put up. The bottom one is 24" from the floor and they are spaced 14.5" apart. Kind of a funny number I know, but they needed to be far apart enough to hold the big jars, but I couldn't have the top shelf end up so high that I couldn't reach it. That's a serious consideration for us shorter persons.
At this point I haven't installed the bottom left bracket because I was still using it to mark the spots to put in the screws on the shelves.
Here's the test to see if I've actually got the shelf level as planned.
Success!
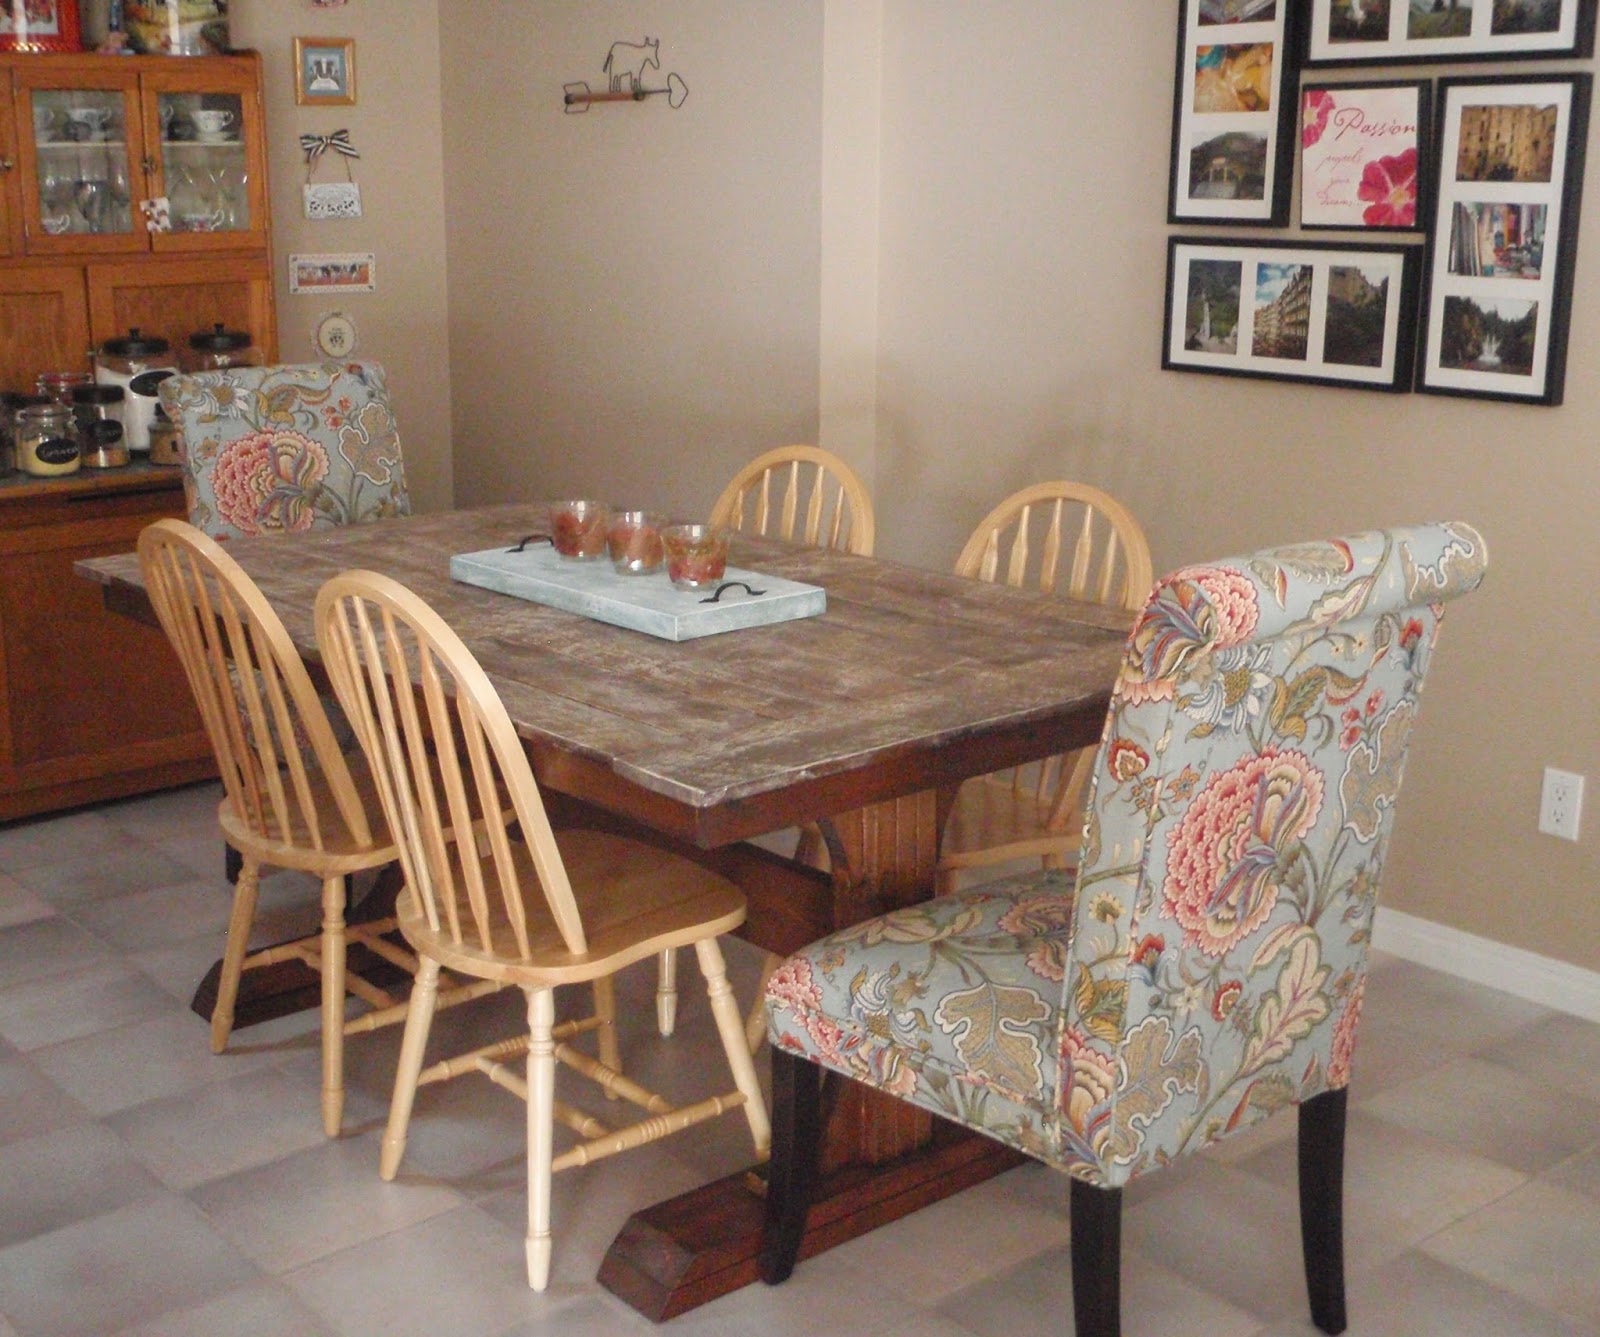
All four shelves up and now time to decorate.
I played with moving things around on the shelves and had to put some things on the floor as it just looked too empty underneath. Maybe it's the spot to build some bins for potatoes and onions or something.

But now it's a lot of different woods in my kitchen area, so maybe the next thing to tackle is painting the cabinets. That'll be a big project but I'm not painting the table or my great-grandmother's antique baking hutch!
~Lisa

Wednesday, 21 January 2015

Kid's Letter Decoration

This is a quick little project that I did for a little girl named Charlotte.
I knew that she didn't really need any more clothes or blankets, so I wanted to make a decoration for her room. Baby girls have a proliferation of things pink and purple, so I wanted to go in a different direction. Blue is my favourite colour, so it would represent me. :)
I bought the letter and the small package of paper flowers at Michael's. The flowers were near the scrapbooking things if you want to pick some up. You could also get a plain wood letter, but I thought the white would be nicer if it ended up showing through.
A little bit of hot glue was all that was needed to attach them to the wooden letter.
I started at the top corner and was going to work my way around, but I thought I might end up attaching the flowers in straight lines by accident, so I started to go random.
I actually took this picture on the blue paper (from the big stash of card making paper) just so it would stand out some and you could see what I was doing. But I do like how this looks where you could have a fairly plain letter with a few accent flowers stand out against a bold coloured wall. But I didn't know what colour Charlotte's room was, so I just kept going with the flowers.
Here's it completed covered. Only a few hot glue burns in the process!
I did have an assistant in the process and this was her project.
I don't know if it comes through in this picture very well, but I added a few sparkle gems (also from the card making supplies) in the middle of some flowers just to finish it off. If you compare it to the picture above, you can see one in the blue flower on the left side. I was surprised at how much of a difference those little details made.

This whole thing took maybe 30 minutes and cost about $10. Super easy, but super cute!
Here's Charlotte looking thrilled with her gift!

~Lisa

Wednesday, 17 December 2014

Key Frame

 
This key frame is the perfect spot to hang your keys when you come in the door so you know exactly where they are when you want to head out the door. And it looks great! 
I started with a basic frame. This one I made from old painted wood, and it is 5.5 inches by 7 inches. It's rustic looking, not perfectly square, but I like it. 
You can buy or make a similar one to fit your space. 
Line the back of the frame with your choice of paper, this is a piece of scrap booking paper that I cut to size. I glued the paper to the backing and then attached it to the frame. 
I found these antique looking keys at the craft store, I bought them a long time ago but I knew I would find a "need" for them some day. Using a hotglue gun, I attached the keys to the paper backing. 
Screw the cup hooks in to the bottom of the frame.
 Now hang this in your entryway and you are done! No more lost keys! 
~Jess

Wednesday, 10 December 2014

Another Farm Table


This is the story of me building my farm table from barn wood. If you want to see the one Jess did, see her post here: Rustic Farm Table

It was great for me because Jess did all the original groundwork to learn about staining and waxing a table and had the great advice for me on this second attempt at building a table.

I think it's so neat that we're able to use the old wood from the barn that was on the farm. I'm hoping that we've made these tables strong enough that they'll be passed down for more people to enjoy.

This is a long story with lots of photos, so read on...

Monday, 4 August 2014

Layered Photographs

I heard a description of doing this and thought it could be a really neat way to display a picture. When it's put together, I think it's a great way to showcase what doesn't fit in a single image. A bit of a panoramic view, depending on how wide you go. The materials required are really quite simple - several photos, some double-sided tape, background paper, and a frame.

Mom loves flowers and toward the end of summer there are flowers flowering all over the place and walking up the sidewalk to the front door almost requires a machete to get through them all! But it's really beautiful and since this has been "home" for more than a quarter-century now, I wanted to use this as my muse.
I actually took the pictures a few years ago, so that's why my final framed image doesn't match what the outside of the house actually looks like now. It's surprising how much bigger the trees got behind the house.

Start by taking several photos. Just stand in one spot and move the camera around, taking both horizontal and vertical shots. I wish I would have had more vertical pictures to use. You're going to want to err on the side of too many pictures than not enough. You'll never be able to stand in the exact same spot and have the same amount of light again if you discover you're missing the top of the tree you really like.
Now get your images printed. From a digital camera, I'd recommend submitting the photos online to wherever you get photos printed instead of doing the instant-print kiosks. When I had photos printed one time, I started with the instant kiosk and didn't like how they turned out. The lady told me that the machines "in the back" are of a much higher quality than those that will print them instantly, so I'd say it's worth the extra wait.

Once you've got the photos in hand, overlap the photos to create the single image. Play around with which ones you want to end up on top. The last one I put on was the bottom centre because the dog was curled up there on the lawn and I wanted that to show.
Then separate them again so you can start gluing them together. The same double-sided glue tape that you use to make cards can be used here. If you don't have that already, you can buy it at craft stores or a well-stocked dollar store. 
I started with a small piece of scrap paper at the back to glue the first few photos together, but after that there will be enough of a base that each photo will be attached to a couple others. When it was all put together is when I figured out the size of the photo frame I'd need. This one ended up as an 8 x 10. I'm not sure I'd make it smaller than that as what's the purpose if you're just going to cut it down so it fits into the size of a regular photo anyway?

Last set is to mount it on the background paper and frame it. I think if I was to try it again, I might take pictures to fill in more of the sky and the trees at the side so there is less empty space in the frame.
Note that if you try to go too wide from the centre of what your image will be, the picture will really start to curve and get a bit distorted (think of how things look on Google Street View). You can see that happens on the left side of my finished piece and I didn't really realize it until I had mounted it on the final background. This will be more noticeable with straight lines (like the edge of the driveway in mine), so depending on what you're shooting, this may not stand out too much. Wikipedia has some good information here.

Now your turn to showcase a favourite location!
~Lisa

Sunday, 27 July 2014

Chalkboard Serving Tray

A Chalkboard Serving Tray is beautiful addition to any home. Think of the possibilities!
My Crafty Girlfriend invited me over for an evening of crafting at her home. 
We made these beautiful serving trays, with a chalkboard on them! How genius is that?!
This wood is 2 x 10 and cut at 2.5 feet long. 
We applied a coat of stain to the edges and backside, yet tried to avoid the middle area where we planned to paint the chalkboard. 
Here you can see the front side of one tray and the backside of the other. 
The wood is pine and the stain is "Early American".
Using painter tape, we taped off the area to apply the chalkboard paint. 
A little trick to make sure the paint doesn't bleed under the tape: 
Paint a thin layer of Modge Podge over the edge of the tape, this will seal up the edge. 
Have a drink while that dries....
Now paint the taped off area with chalkboard paint. Use long even strokes to avoid brush marks in the paint
Now go ahead and remove the tape.
Do this before the paint dries or you risk the paint chipping off along the taped line. 
See? Beautiful clean, crisp lines!
Now, add hardware for handles. 
How perfect are these? Super cute little fork and knife!
A beautiful centerpiece or serving tray!
Please note: unfortunately you have to wait about 72 hours until the chalkboard paint is completely dry. Then you have to lightly put chalk all over it and rub it off before you can write anything. Oh, and when you wipe the chalk off at the end of your party you can use a damp cloth but then you have to repeat these steps again. So friends, that is why there are no pictures of chalk words on the chalkboard tray....still waiting!